
Google Forms remains a powerhouse for creating surveys, quizzes, and registration forms. This user-friendly yet powerful platform offers endless possibilities for gathering valuable information efficiently. In this article, we’ll walk you through every step of creating, editing, and customizing Google Forms. From crafting your first form to implementing advanced design elements, you’ll learn how to tailor Google Forms to fit your specific needs.
In this article, we will cover all of the above scenarios so that you get the idea in order to edit the Google form easily.
If you want to create a Google form for your students colleagues or any other audience then here are the basic steps that you need to follow in order to create and edit the Google form before publishing it.
As you know Google Forms is a web-based application which means that Google Forms does not have any app on the App Store or Play Store so first we will need to head to the Google Form website.
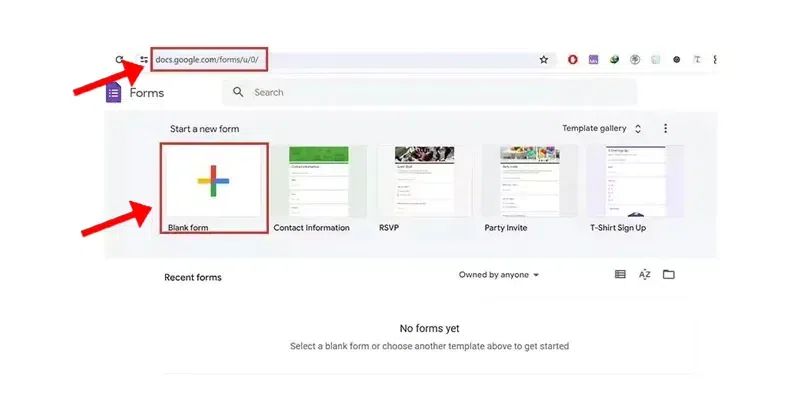
After this, you will have an empty form labeled as Untitled form that you can edit. Once you have completed the above steps then you can move to the next steps where we will edit the form.
Now we have several options to choose from to edit or update our Google form as we want, we can make changes to the questions and add titles as well as sections images, and videos to our form. Along with these we also get options to make changes in the form settings. Let’s understand each process of editing the Google form separately.

If you want to add a section then it is very simple to do so, all you have to do is simply choose the last option of the form , this option will allow you to turn a single question into a single section and so on.
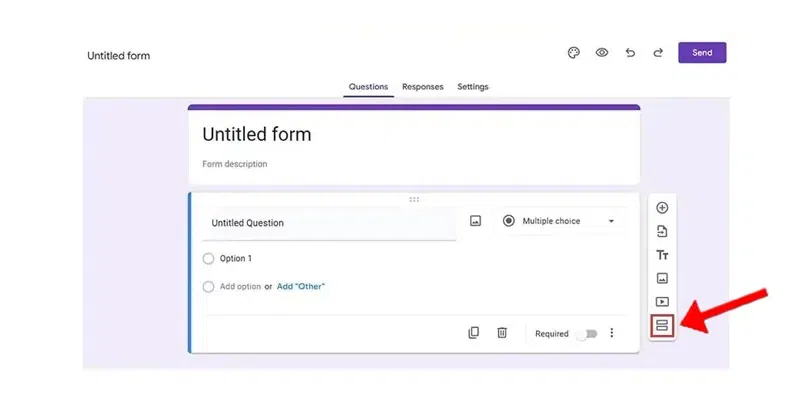
To edit a question, click on the desired question, enabling you to make changes directly.
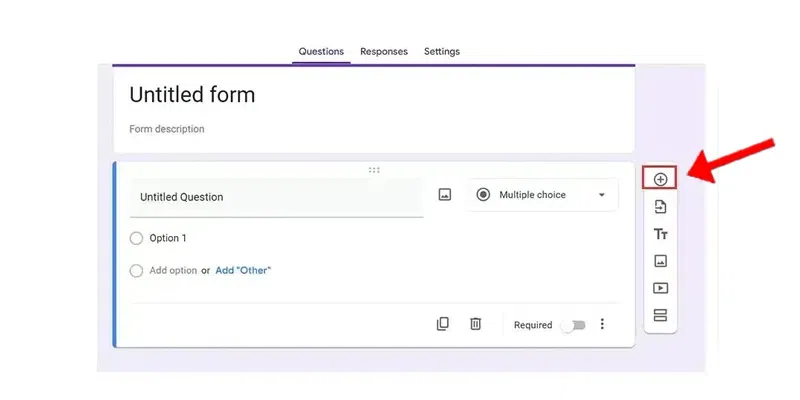
To add a new question, click on the plus icon located at the top of the right sidebar. This action allows you to create a new question, as illustrated in the image below:
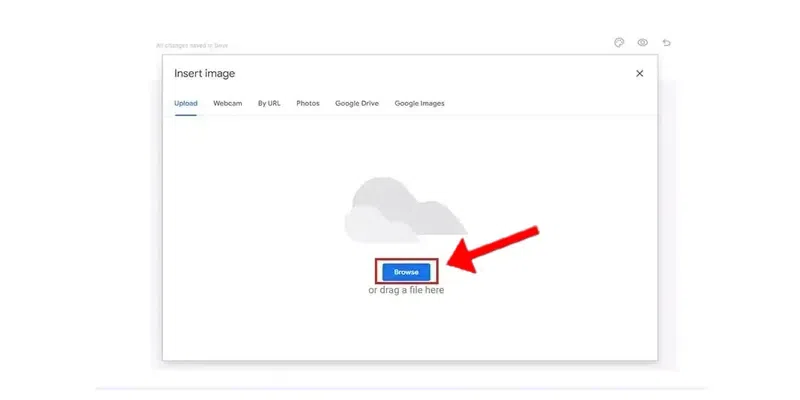
Open the form in which you want to add image/video.
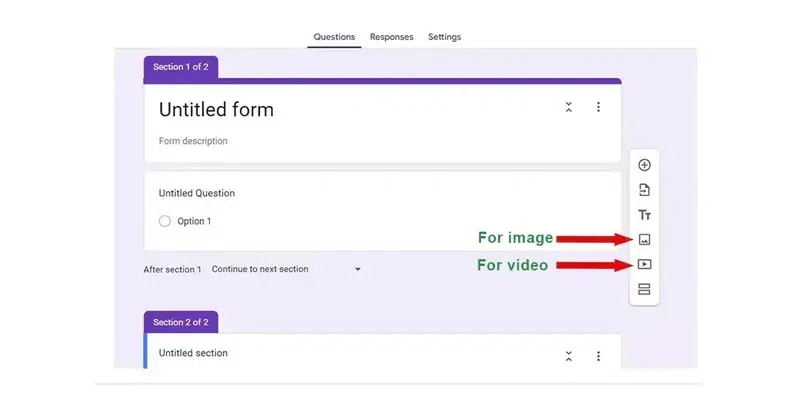
Now, if you want to add an image then select the fourth option from the right sidebar, and that will allow you to choose an image from your Google Drive folder:
If you are the administrator of the form and after publishing the form you want some changes to be made then you can easily do that as well, all you have to do is simply follow the steps mentioned below.
If you are the administrator and you want to enable the users to allow response editing, then you can do it by following the steps below:
Open the Google form in which you want to allow response editing.
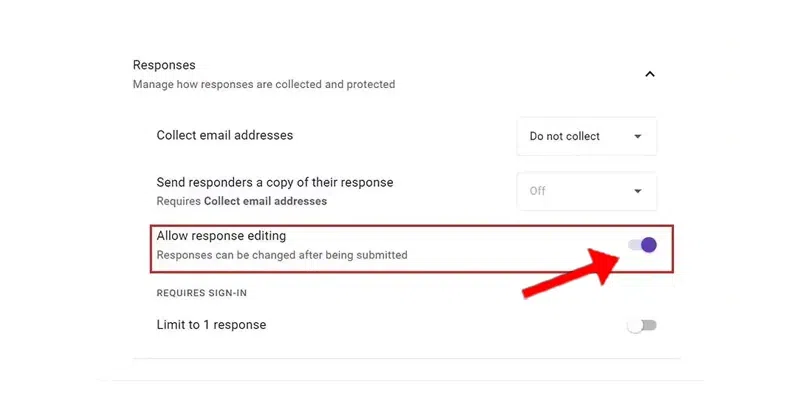
Go to the Settings tab, the settings tab is the 3rd tab available. Select the Responses option and click on the arrow option on the right, that will open the response settings.
You will see the allow response editing option, by default it is turned off, so in order to turn this option on, you will have to click on the side option which will turn it on. As you can see in the image below:
All set, now any responder of your form will have the option to edit the response in case they make a mistake.
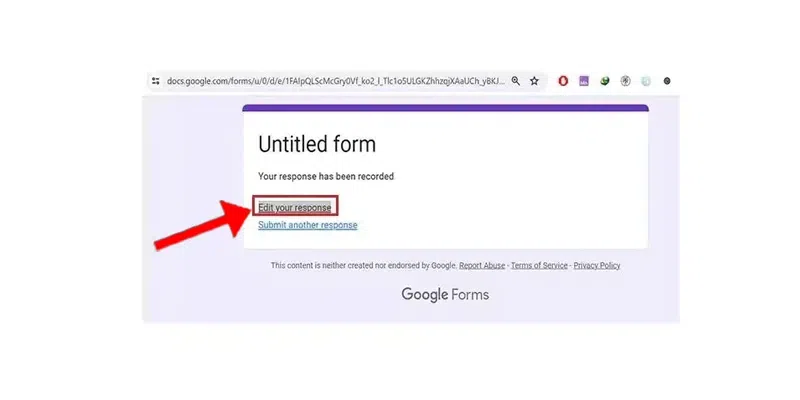
This is only possible if the administrator of the form has enabled response editing in his Google form settings. If you think that you have made some mistake then you can simply edit the response that you have submitted by following the steps mentioned:
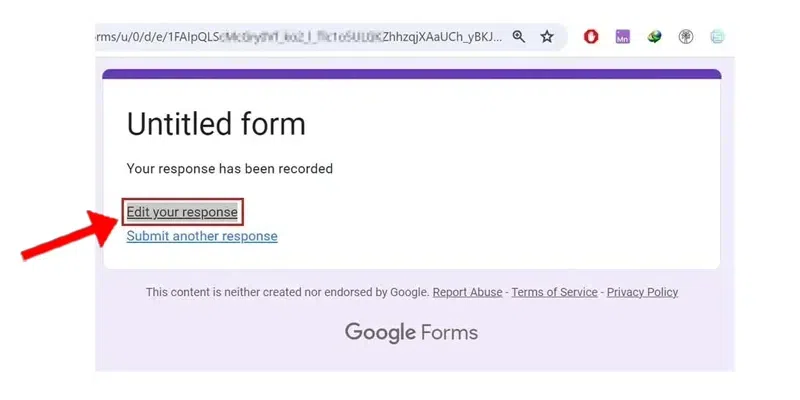
Click on the “ Edit your response ” option, this option will be available to you once you submit the form. (As available in the image below.)
Note: If you have closed the window, then simply go to the link and open the form again and you will see this option to edit your response. Make the necessary changes that you want to the form and simply click on the submit button.
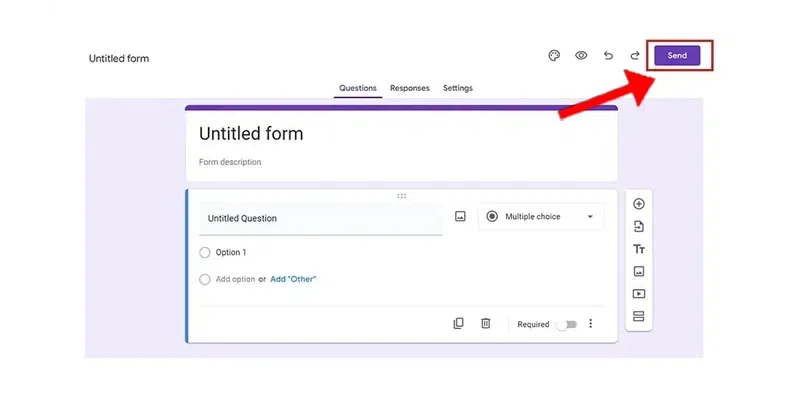
Now, once you have completed the form you can easily send it to anyone by using the Send button which you will find at the top right corner as you can see in the image below:

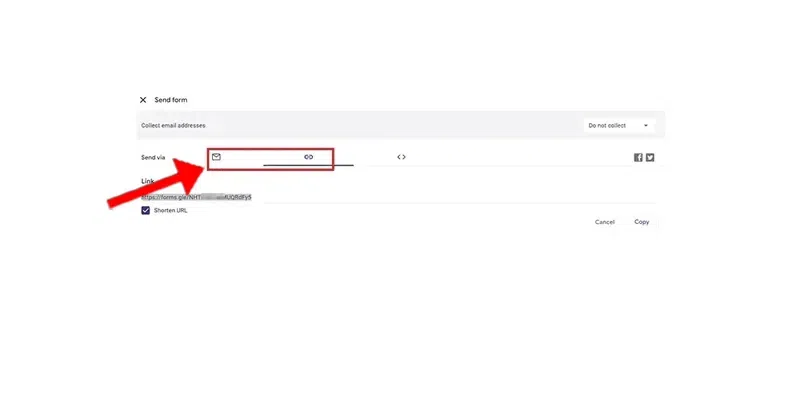
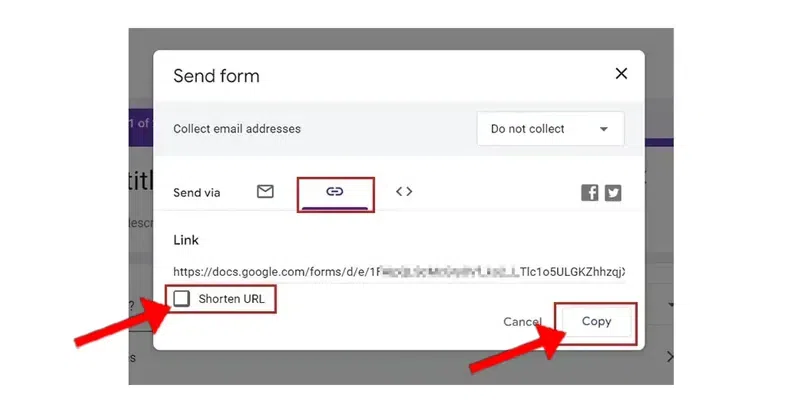
After this you can simply choose the method for sending the form, the most commonly used methods for sending the form are either through email or through the link . Both of the methods are available right next to each other as you can see:
So feel free to choose any of the methods you want to send the google form.
If you want to make changes to the Google forms that you have submitted then the steps for that are very easy, just follow the steps given below and you can easily change the submitted form:
Note : Changes in the submitted form is only allowed if the administrator has allowed making changes in the form.
You can easily change the form even if you have submitted the form but only if the administrator has enabled the option to edit your submitted response. it is up to the administrator of the form to enable this option or not. Either way, if the administrator has enabled the option then you can follow these steps to change the submitted form.
The first step is to open the link that you received for filling out the form, once you have opened the form then you will see a window similar to the one in the image below:
You can use the option provided in Google Forms to set up the editing link, the editing link is useful whenever you are making changes to the form, and through the link you can access the form. Following are some steps through which you can set up an editing link in the google forms:
Go to your Google form and open the form which you want to edit, once you have opened the form you will see the interface for editing your form, then move to the next step.
After following step 1, simply follow this step, in this you see the interface below simply click on the “ send ” button.
 Open the send option" width="800" height="inherit" />
This is the final step, simply click on the middle link option as seen in the image below, this will allow you to get the link to your Google form, simply copy it using the copy button. You can also shorten the URL by using the Shorten URL option .
You can also create your own script, for this, you will have to use the Google Apps Script which is a Javascript language that is integrated with the Google Workspace. Following are the steps to create a script using Google Forms.
Go to your Google Forms and create a new form. you can also open any existing Google form if you want.
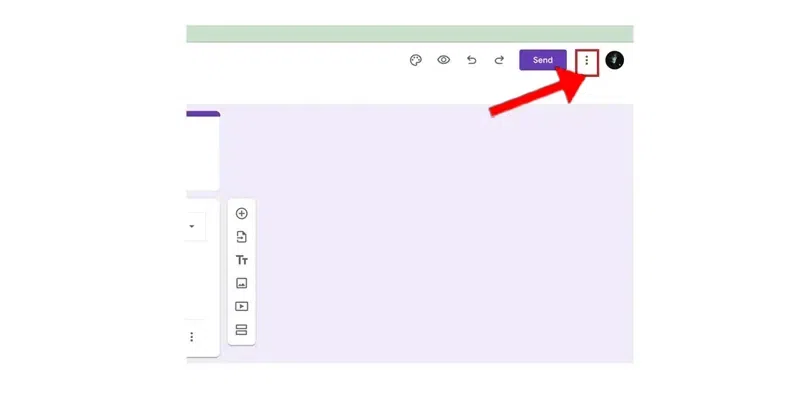
You will get to see a three-dotted menu , click on that three-dotted menu, and the menu will look similar to the one in the below image:
Then you will have to click on the “ script editor ” option. this will redirect you to another Google Apps page which will have the option to add your own script for the Google form that you have chosen.
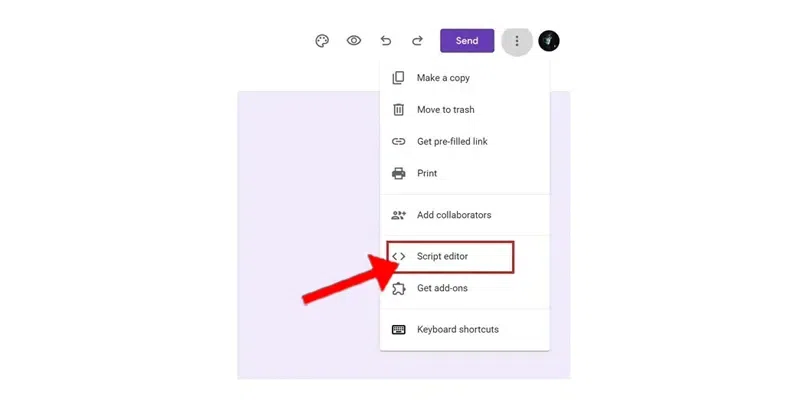
This will open the script editor where you can add the script and deploy it easily.
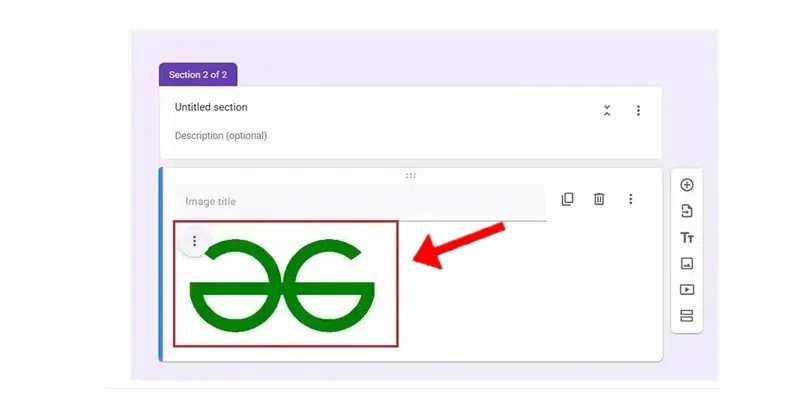
Sometimes you may have to duplicate a property in Google Forms and it can become a boring and time-consuming task to write and make everything on your own again, so instead you can simply duplicate the question, image, or any other property.
Go to Google Forms and open the form that you want to duplicate, for example, I have a form as you can see below in the image that I want to duplicate, after this select the specific section that you want to duplicate.
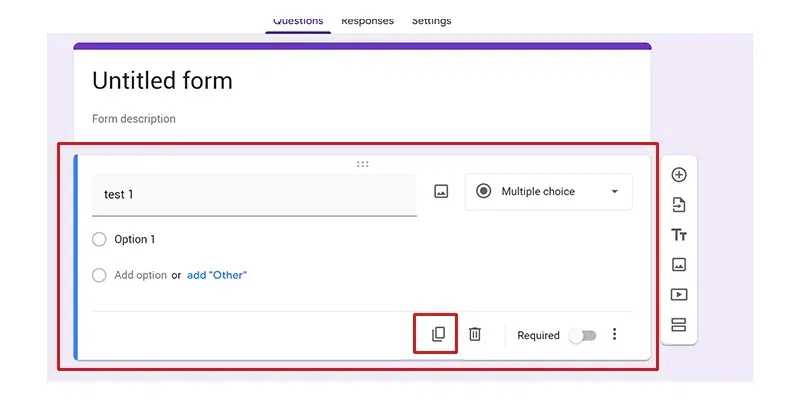
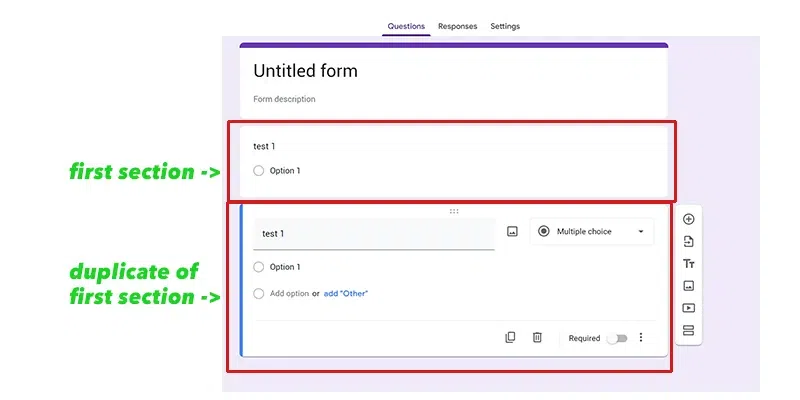
After this, simply click on the duplicate option which is available right next to the delete/trash option. When you click the duplicate option the property that you had selected will be duplicated.
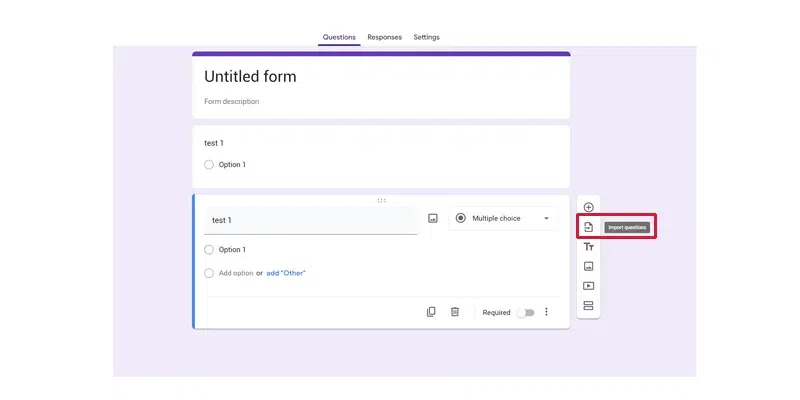
If you have multiple forms and some questions are also present in the previous form then instead of writing it from the start you can simply import it from the old form. For this, you have to:
Click on the “ import questions ” it’s the second option available on the right side.
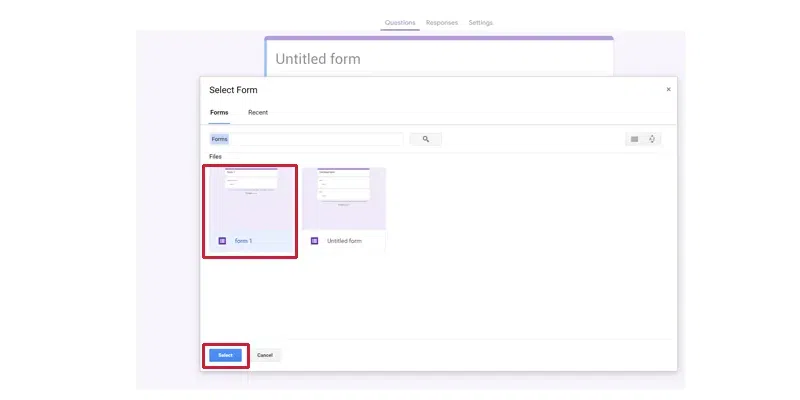
After following the 1st option, you can simply click on the form you want to import from that is available on the list of forms of your Google account. As you can see in the image below I have a form named “ Form 1 ” that contains a question that you want to import so you will simply click on the form and then click on the “ select ” option.
Once you have selected the form from which you want the question to be imported, you can see the list of sections and questions in the right sections, you can either import all the questions or select ones from this list.
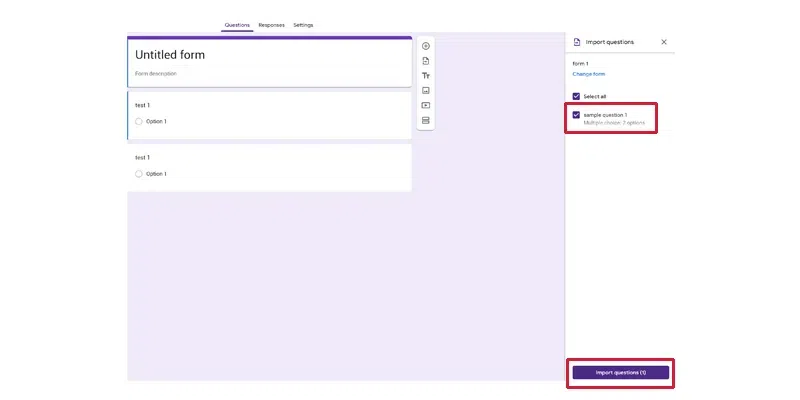
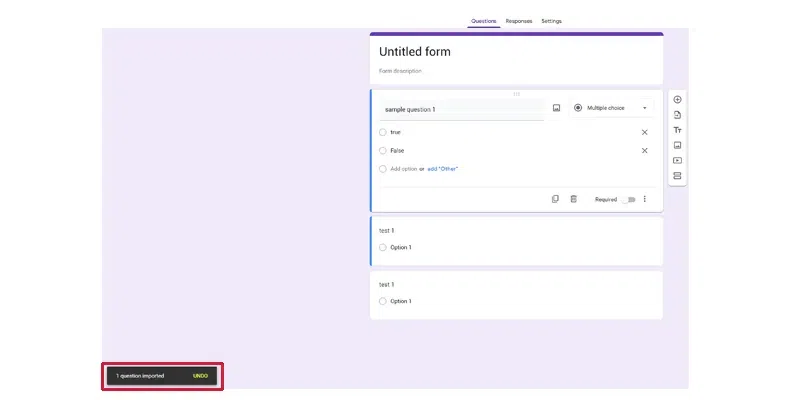
Once the above step is completed and you have selected the question you want to import, then simply click on the “ import questions ” option, this will import the questions to the current form that you are editing.
Deleting any question, image, or section in the Google form is a very simple and straightforward process, for this, you can simply select the question, image, or section that you want to delete and then delete it using the trash icon available next to the duplicate option, as you can see in the image below:

Google Forms allows a special record feature or button which can be used to reorder the form’s sections, this option or button has the icon of 3 dots and below the 3 dots are another 3 dots, as you can see below:
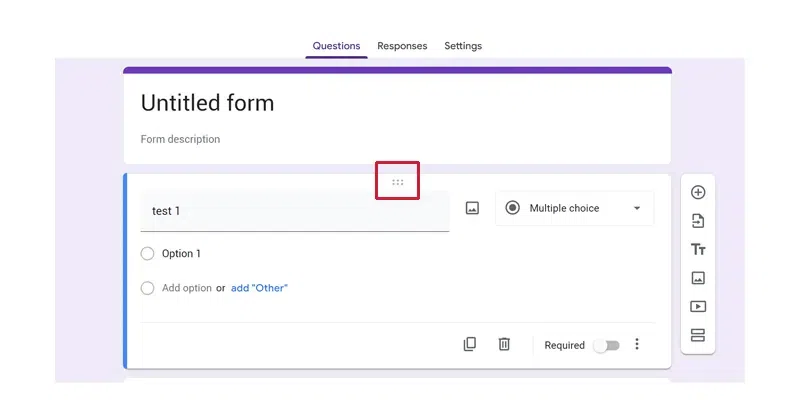
You can click on this option hold the mouse’s button and record the form by moving it in the upper and lower directions.
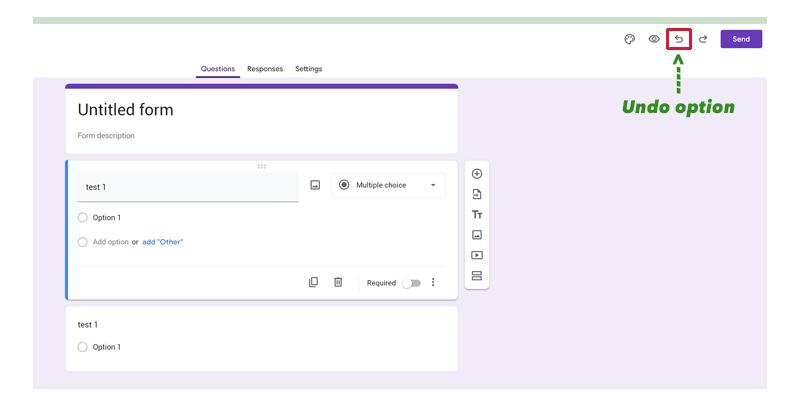
There is an option present at the top of the Google form with arrows to the backward side, this arrow can be used to undo any action that you may have performed in the Google form, this arrow is commonly used whenever mistakes occur in the form and you want to undo it, if you have pressed the undo option too many times then you can simply click on the forward arrow option known as “ redo ” which will again perform the actions that you just undoed.
Google Forms is a great way to collect feedback and information from our customers and users in order to provide a better environment for them. You can use the Google form for anyone by using the link or the option of email, In this article we also learned how to use Google Forms and add various sections, questions, images/videos to the form.
Apart from that we discovered various methods and features of Google Forms. So refer to this article and you will be able to use Google Forms easily.
Yes , whether you are the creator of the form or you are the audience you can easily edit the google form by following this article.
Yes , it is very easy to edit the google forms in the mobile as well as desktop, you will have to follow this article to edit the form and the steps are same for both desktop and mobile.
Yes , you can add collaborators in the form and then edit the form together.

Edit a PDF in Google Docs - Quick TipsOpen your Google Drive.Upload the PDF file you want to edit >> right click on the file.Choose "Open with" and select "Google Docs."Make your edits within the Google Docs interface.Once done, go to "File" and select "Download."Choose the PDF format to save your edited document.Editing PDFs is simple with Google Drive and Google Docs. It’s important to know how to edit PDFs without needing extra software. Whether you need to fix a report, update a resume, or fill out a form, Google Docs makes it fast and easy. This article will show you how to edit a PDF in Google Drive, including how to upload your PDF, make changes, and save your edits. Let's get started! Table of Content How to Edit PDF in Google Drive Using Google DocsStep 1: Open your Google DriveStep 2: Upload the pdf that you want to edit to your DriveStep 3: Open it with Google DocsStep 4: Edit the pdf as you wantStep 5: Download the document in PDF formatTips and Best Practices for Editing PDFsHow to Edit PDF in Google Drive Using Google DocsStep 1: Open your Google DriveOn the Google Home Page, click on the Bento menu icon; from the dropdown, click on the Google Drive icon to open
A recent PwC study found more than 73% of businesses now use some form of AI tools. That means, over 250 million companies are using or looking into AI tools in their business processes. AI-powered writing assistants are transforming how we create content. These tools are a game-changer, a time saver, and boosting our creativity. But they aren't always perfect. Sometimes the results are too generic, or just slightly off the mark. These generic results feel significant when you’re looking for quick, accurate information. That's why Google Gemini introduced a feature that gives the flexibility to edit its responses. Think of it like upgrading your digital writing assistant – you get the AI's power along with your expertise. It is possible to edit and regenerate drafts of a Gemini app's answers. For instance, you can modify a response's length, make it simpler, and alter its tone. In this article, We'll show you how you can edit and modify Google Gemini responses. How to Edit and Modify Google Gemini Responses What is Google Gemini’s AISteps to Edit and Modify Google Gemini ResponsesImportant Notes from GoogleEnhancing Your Google Gemini ExperienceConclusionFAQs - How to Edit and Modi

Creating and managing tables in Google Docs helps you organize information effectively, making your documents more professional and easier to read. Whether you're drafting a report, preparing a project document, or scheduling, knowing how to insert and edit tables is a valuable skill. In this article, you will learn the process of adding and formatting tables in Google Docs, including tips for mobile devices. To get started, we'll show you how to insert a table in Google Docs and provide some useful tips on table formatting. You'll learn how to create tables, adjust their styles, and use features like merging cells and aligning content. Additionally, we'll cover how to work with Google Docs table templates, format your table of contents, add a Table in Google Docs on iPad and Mobile and make your tables visually appealing with borders and spacing adjustments. Table of Content How to Insert Table in Google DocsHow to Edit a Table in Google Docs How to Insert a Table in Google Docs on MobileHow to Insert Table in Google DocsTo insert a Table in Google Docs with row and column according to your need, follow the steps below: Step 1: Open Google DocsOpen your Google Docs and click on Yo
.png)
Google Docs provides a feature where various team members can create a document simultaneously. Each person creates the context and saves the file, that instance goes into the History of the document. An authorised person can view the history and restore the session from any point. There are many benefits of accessing the history and edit it, if required. It can help you in many ways like when you are working in teams or during collaborations or checking the timeline. Below are mentioned benefits of editing history in Google Docs. Uses of Edit History in Google DocsIn Google Docs, the Edit History feature is frequently used for a variety of reasons, including: 1. Collaboration and Teamwork: Various team members are working on the same document, then the edit history feature allows them to actually manage and track the changes made by the sub-collaborators. This is also beneficial to avoid merge conflicts and enables improved collaboration, as each team member gets the updated version of the file or document. 2. Recovery from Mistakes: Many times, we unintentionally delete or manipulate the data which is very much significant in the document. With the use of the edit history feature

Google Messages, the popular messaging app that comes pre-installed on many Android phones, is reportedly getting a new feature that will allow users to edit sent texts. This feature, which is already available in other messaging apps like WhatsApp and Apple’s iMessage1, has been a long-awaited addition to Google Messages. What is the new feature in Google Messages?Google Messages is introducing a new feature that allows users to edit sent messages. This addition is particularly useful for correcting errors or revising sent messages, improving the overall user experience. However, it's important to note that the recipient can still view the original message, as Google keeps version history. This feature is expected to roll out soon, bringing Google Messages in line with other messaging apps. How to use the new feature in Google Messages?Step 1: Open The Google Messages App On Your Android Phone Step 2: Go To The Conversation Where You Want To Edit A Sent Message. Step 3: Long-Press The Message To Edit. This Will Bring Up A Top Row Of Options. Step 4: Tap On The Pencil Icon That Appears. This Will Open A Text box with the original message. Step 5: Edit the message as needed in the t

Editing a PDF isn't always easy, especially if you're trying to keep the same look. Google Drive can help. We've got all the steps to change your PDF using Google Drive. Hoping everything is simple to Edit the file, Or maybe you need a more significant change. Either way, Google Drive can assist. It keeps the document looking just right. We will show you how to add your PDF to Google Drive, guide for editing, and make changes. We won't ruin the original plan. And, it will all be easy and quick with Google Drive. Table of Content Does Google Drive have a Free PDF editor?How to Edit a PDF in Google DriveHow to Edit PDFs in Google Drive on AndroidConclusionFAQ'sDoes Google Drive have a Free PDF Editor?Google Drive may not hold its PDF editor, but it lets you edit and modify PDFs via Google Docs. This tool comes without a cost but with certain restrictions, notably with holding intricate formatting and images. For minor text changes and notes, Google Docs proves handy. Yet, for deeper PDF modification requirements, one may need specific software or web tools that cater more extensive PDF editing skills than what Google Drive and Docs give. How to Edit a PDF in Googl

Creating a prefilled Google Form from a Google Sheet helps in sending personalized surveys or registrations. This technique allows you to automatically fill in parts of a form based on the data you already have, saving time and reducing entry errors. In this case prefilled Google forms are your savior. Use this technique once and you are good to go with filling details of a large amount of respondents. It will also help you focus on your prioritized work. On the other hand, it will eliminate human error in creating wrong forms. Let's see how to Create a Prefilled Google Form from a Google Sheet. What is a Pre-Filled Google Form?A pre-filled Google Form is like a form that's already been partially filled out before you even see it. This can make it quicker and easier for you to answer because some of the information is already there. It's handy for things like surveys or sign-up form. Prefilled Google Forms is a hassle-free and time-saving technique that helps you collect data without having repetitive data. Suppose you are an employer and have information about your employees but you want to record more details about your employees like their marital status, kids, etc. Getting all